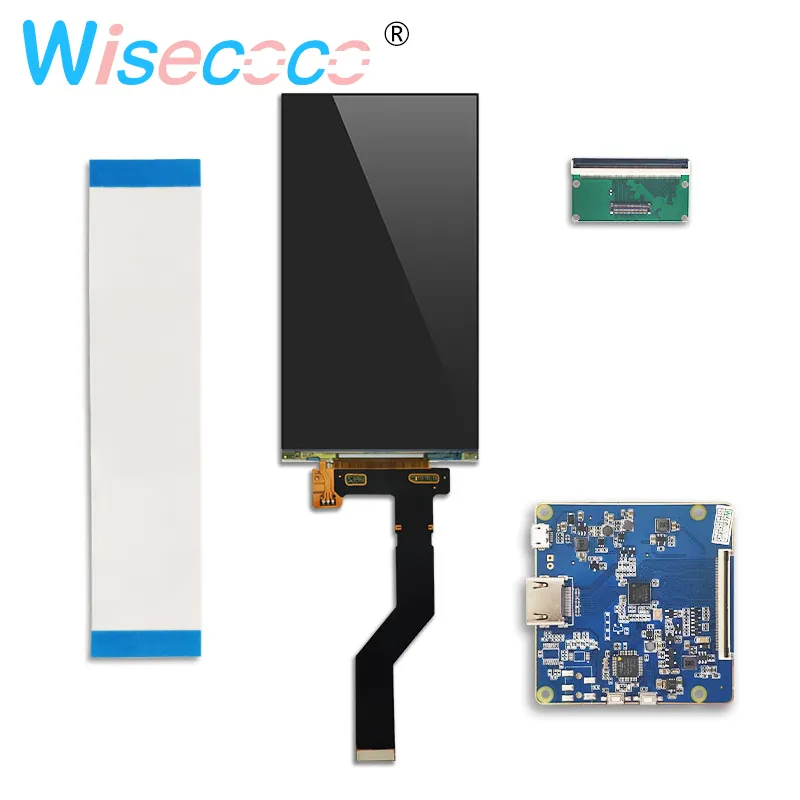
Display
We used a 6 inch 2K (1440x2560, portrait) LCD screen with from a provider, Wisecoco, in China. It comes with a driver board, powered through a micro USB port, equipped with a MIPI, an HDMI port, an LED indicator, and two buttons for restarting and adjusting the brightness settings.
Overview
Specifications
| Parameter | Value |
|---|---|
| Screen Type | TFT |
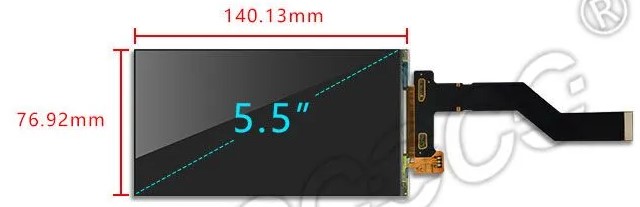
| Display Size | 6 inch |
| Compatible Brand | Universal |
| Product Type | Panel LCD Combo |
| Brand Name | Wisecoco |
| Origin | Mainland China |
| Certification | NONE |
| Diagonal Size | 6 Inch |
| Type | CG-Silicon, LCM |
| Pixel Format | 1440(RGB)*2560 [Quad-HD] 490PPI |
| Configuration | RGB Vertical Stripe |
| Active Area | 74.52(H)*132.48(V) mm |
| Outline Dim. | 76.92(H)140.13(V)1.35(D) mm |
| Luminance | 450 (Typ.) |
| Contrast Ratio | 1300:1 (Typ.) (TM) |
| Viewing Angle | 80/80/80/80 (Typ.) |
| Operating Mode | New Mode2, Normally Black, Transmissive |
| Interface Type | MIPI (2 ch, 4 data lanes), 50 pins Connector |
| Not support | iOS, Mac system |
| Working mode | Portrait mode (can be adjusted to landscape mode through PC) |
This display uses its own driver board with an HDMI port, which makes it convenient to use with all sorts of devices. It's straightforward to use this display with a PC since the operating system automatically and accurately detects the EDID provided by the display driver board. However, when it comes to Raspberry Pis, the process becomes a bit more complex.
HDMI Timings
We need to configure our device to ignore the incorrectly provided EDID and manually input the HDMI timings and other settings. We contacted Wisecoco to obtain the correct config.txt files, but regrettably, the hdmi_timings they provided turned out to be incorrect.
We were able to identify the display as: LS060R1SX02. [Archive]
The Adafruit documentation by Phillip Burgess provides comprehensive guidance on working with displays like this one: Using Weird Displays with Raspberry Pi - [Archive]. This resource explains how to configure proper HDMI timings in /boot/config.txt. However, this information alone will not be sufficient to determine the correct HDMI timings.
An example for HDMI Timings:

Finally, we turn to the - 2k Portrait Mode HDMI Display 1440p (1440x2560) how to rotate into Landscape? post on forums. The author explains how to use Custom Resolution Utility (CRU)-[Archive] on a Windows PC to determine the correct HDMI timings. This is the approach that led us to success.
Here are the working HDMI timings we found for LS060R1SX02:
hdmi_timings=1440 1 70 35 45 2560 1 12 2 2 0 0 0 60 0 245750400 3
Details
| Description | Value |
|---|---|
| Horizontal active pixels | 1440 |
| Horizontal sync polarity | 1 |
| Horizontal front porch | 70 |
| Horizontal sync pulse | 35 |
| Horizontal back porch | 45 |
| Vertical active lines | 2560 |
| Vertical sync polarity | 1 |
| Vertical front porch | 12 |
| Vertical sync pulse | 2 |
| Vertical back porch | 2 |
| Vertical sync offset A | 0 |
| Vertical sync offset B | 0 |
| Pixel repetition factor | 0 |
| Frame rate in Hz | 60 |
| Interlaced mode (0 for non-interlaced) | 0 |
| Pixel clock frequency (Hz) | 245750400 |
| Aspect ratio (3 for 16:9) | 3 |
- If the LED on the driver board fails to turn green, it is likely due to incorrect timings.
- If the LCD displays only half of the section despite inputting the correct timings, this issue may be attributed to a power shortage on either the Raspberry Pi or the driver board. Diagnosing this problem can be challenging.
Please refer to our Getting Started for the whole config.txt files.
See Notes below for other resources.
Installation
Assembly
Notes
- IMPORTANT: When placing your order for purchase, be sure to specify that you request a "60 FPS driver"!
- There are numerous online posts discussing challenges related to running such displays with Raspberry Pis, be sure to check them if our approach did not work for you:
- 2k Portrait Mode HDMI Display 1440p (1440x2560) how to rotate into Landscape?
- HOWTO: Create Custom HDMI modes
- HDMI Timings/Other configs for RPi4 and LS060R1SX02
- 2k lcd only half section showing 1440x2560
- Problem with 2k hdmi output(half screen blank)
- 2560x1440 monitor defaulting to 1280x768 on Pi OS Lite
- 5.5inch lcd 2k strange image
- HDMI Display Problems with Pi 3A+ and LS060R1SX01 screen
- LS055R1SX03 5.5 inch 2k 2560*1440 cli too small to read
- 2k lcd only half section showing 1440x2560
- highest resolution supported by pi0? 2560x1600?
- Graphics Drivers for Pi 4
- Help with getting hdmi displays working
- 5.5inch 1440x2560 LCD
- Change resolution on LS055R1SX03 2k screen