Getting Started
Headset
Here are the steps for building the Wisor headset:
Hardware
First, follow the instructions for constructing the necessary casing components:
Next, acquire the electronics components specified here:
And, the optical combiner:
Finally, perform the Assembly. Make sure to perform IMU calibration after mounting on the headset.
Software
Wisor is built to run on Raspberry Pi OS. We recommend that you work on a fresh install.
We support Bullseye. (See Limitations & Future Work). Tested on:
- Operating System: Raspbian GNU/Linux 11 (bullseye)
- Kernel: Linux 6.1.21-v7+
Use Raspberry Pi Imager to install Raspberry Pi OS. Make sure to enable SSH and set WLAN credentials in advanced options menu.
Advanced options example

Easy Install Wisor
The easiest way install is to perform the following:
wget -qO- http://get.wisorxr.com | sudo bash
or
curl -fsSL http://get.wisorxr.com | sudo bash
The rest of the instructions are the manual steps. If the above process was successful, you should be all set up. Head over to Operating.
Configuration
Raspberry Pi OS uses config.txt in /boot/ folder to adjust system configurations. Our current version of config.txt is as follows:
Raspberry Pi 3B+ (Bullseye)
# Enable HDMI hotplugging to force HDMI output even if no display is detected.
hdmi_force_hotplug=1

# Set custom HDMI timings for the display.
# Format: <h_disp h_sync h_back_porch h_front_porch v_disp v_sync v_back_porch v_front_porch v_sync_pol h_sync_pol de_pol pixel_freq aspect_ratio>
hdmi_timings=1440 1 70 35 45 2560 1 12 2 2 0 0 0 60 0 245750400 3

# Set HDMI group (0-7). Group 2 is typically for DMT modes, commonly used for computer monitors.
hdmi_group=2

# Set the HDMI mode within the specified group (0-95). Mode 87 is the custom mode.
hdmi_mode=87

# Limit the HDMI pixel frequency to a maximum value.
hdmi_pixel_freq_limit=252000000

# HVS (Hardware Video Scaler) priority configuration.
hvs_priority=0x32ff

# Limit the maximum framebuffer width and height to specific values.
max_framebuffer_width=1440
max_framebuffer_height=2560

# Set the framebuffer width and height, potentially for a lower-resolution display.
# Increase the values up to 1440x2560 if your device can handle it.
framebuffer_width=720
framebuffer_height=1280

# Increase HDMI signal boost to 4 (useful for long HDMI cables).
# config_hdmi_boost=4

# Allocate 256MB of GPU memory.
gpu_mem=256

# Enable ARM CPU frequency boost.
# arm_boost=1

# Set the maximum number of framebuffers to 2.
max_framebuffers=2

# Disable overscan compensation.
disable_overscan=1

# Enable I2C for the VideoCore (VC).
dtparam=i2c_vc=on

# Set the I2C VC baud rate to 50,000 bits per second.
dtparam=i2c_vc_baudrate=50000

# Enable SPI communication.
dtparam=spi=on

# Enable I2C communication for the ARM CPU.
dtparam=i2c_arm=on

# Ignore EDID data with 0xa5000080 mask.
hdmi_ignore_edid=0xa5000080

# Force the CPU to run at its maximum clock speed.
# force_turbo=1

# Enable the VC4 FKMS V3D driver overlay.
dtoverlay=vc4-fkms-v3d

# Enable the ov9281 camera module overlay.
dtoverlay=ov9281
Simply copy the text above and replace with the text in /boot/config.txt. Here is one way to do it:
cd /boot/
sudo mv /boot/config.txt /boot/config.backup.txt
sudo nano /boot/config.txt
# Paste the copied text.
# Save and quit (Ctrl+X, Y, Enter).
sudo reboot
Dependencies
Ensure your package list is up-to-date:
sudo apt-get update
GStreamer
We use GStreamer to receive/emit real-time video streams.
With Bullseye, we find GStreamer 1.18 already installed.
dpkg -l | grep gstream*
We still need to install a few additional plugins. [Source] [Archive]
# install a missing dependency
sudo apt-get -y install libx264-dev libjpeg-dev
# install the remaining plugins
sudo apt-get -y install libgstreamer1.0-dev \
     libgstreamer-plugins-base1.0-dev \
     libgstreamer-plugins-bad1.0-dev \
     gstreamer1.0-plugins-ugly \
     gstreamer1.0-tools \
     gstreamer1.0-gl \
     gstreamer1.0-gtk3
omxplayer
We tested available methods and 'sinks' using GStreamer to render incoming streams in real-time, however, omxplayer proved to be the most performant on Raspberry Pi.
wget http://archive.raspberrypi.org/debian/pool/main/o/omxplayer/omxplayer_20190723+gitf543a0d-1_armhf.deb # http://archive.raspberrypi.org/debian/pool/main/o/omxplayer/
sudo apt -y install ./omxplayer_20190723+gitf543a0d-1_armhf.deb
Try running:
omxplayer -v
If you get /usr/bin/omxplayer.bin: error while loading shared libraries: libbrcmEGL.so: cannot open shared object file: No such file or directory
cd /usr/lib/arm-linux-gnueabihf
sudo curl -sSfLO 'https://raw.githubusercontent.com/raspberrypi/firmware/master/hardfp/opt/vc/lib/libbrcmEGL.so'
sudo curl -sSfLO 'https://raw.githubusercontent.com/raspberrypi/firmware/master/hardfp/opt/vc/lib/libbrcmGLESv2.so'
sudo curl -sSfLO 'https://raw.githubusercontent.com/raspberrypi/firmware/master/hardfp/opt/vc/lib/libopenmaxil.so'
libcamera
Bullseye comes with libcamera installed. You need to follow the steps below if you are using the recommended Arducam OV9281 camera and getting errors with the pre-built binaries.
git clone https://git.libcamera.org/libcamera/libcamera.git
cd libcamera
meson setup build
ninja -C build install -j 2
sense-hat
Install sense-hat
sudo apt install sense-hat
and perform calibrations if you haven't already.
Wisor Core & Renderer
Follow the 'Installation' instructions of
Operating
Once complete, you can launch Headset software of Wisor through core.
Make sure to stay within the created virtual environment:
source ~/wisor/venv/bin/activate # to activate
To see available arguments:
cd ~/wisor/core/
python3 main.py -h
To launch core:
python3 main.py
Remote Client
The remote client currently works on Unity and Windows (See Limitations & Future Plans).
Follow the 'Installation' instruction of Remote Client.
Operating
Make sure the Remote client and the Headset are in the same network.
- Either drag the
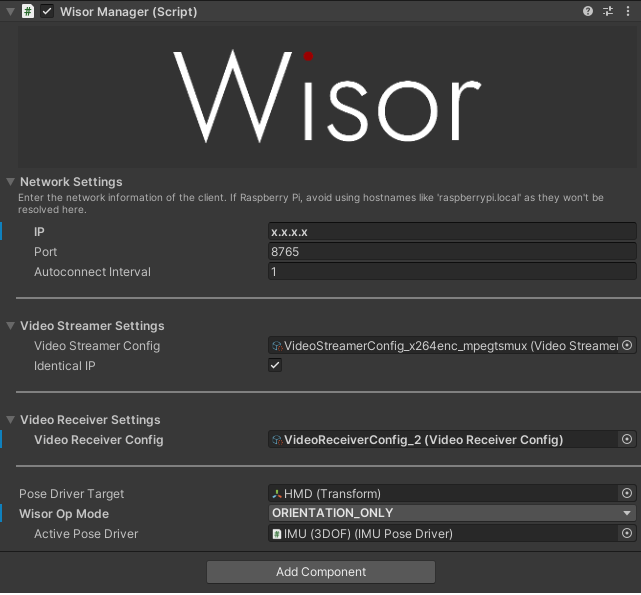
[Wisor]prefab in the scene, or open theMainScene. - Set the IP of the Headset on
WisorManagercomponent of[Wisor].- The Headset will display its IP on the UI. You may also use fing to determine its IP.
- Note that hostnames such as
raspberrypi.local,wisorxr.localwill not be resolved, so you need to enter the IP yourself.
- Remote client will be paired with the headset once WebSocket communication is established with the Headset.
- Remote client will publish the Topics based on the Operation Mode selected by Remote client.
- Remote client will stream the stereo render as long as Heartbeat signal is maintained by the Headset.
- Headset may stream the IMU data and/or camera feed, based on the Operation Mode.